Showing posts with label Imperial Guard. Show all posts

Wednesday, 9 September 2015

Valkyries for my Praetorian IG

I've had a bit of a turn around and decided to move away from the grey I did on my vendetta. It was done some time ago and I think my current desert colour scheme is better, more interesting to look at than something that's mainly grey and silver and ties in better with my tanks when they're all the same basic colour scheme.

This leaves me with somewhat of a quandry regards my older vendetta (and the other two I've got still siting in pieces in boxes some years after I did the first... sigh.) will I repaint the old one. Will I paint the newer two with the new colours. Should I stick to gunships being an imperial navy colour scheme and if so could I make it more interesting with some fenris blue-grey cammo and perhaps some sky underbelly? Anyway for now my three valkyries that I've had in a cupboard for about three years now are getting some desert cammo with sky belly love.

I've never done any masking before so don't really know what I'm doing, I've just used invisible tape as it was what I had to hand! Seems to have worked out really pretty well oddly/luckily enough..

The cockpits and interiors were prepainted by whoever I bought them off on ebay. They've got some fun colour helmets which I like even if they're not quite up to the standard I'd have done them I don't want to risk breaking all the canopy bits ripping them off so that's how they're going to stay.

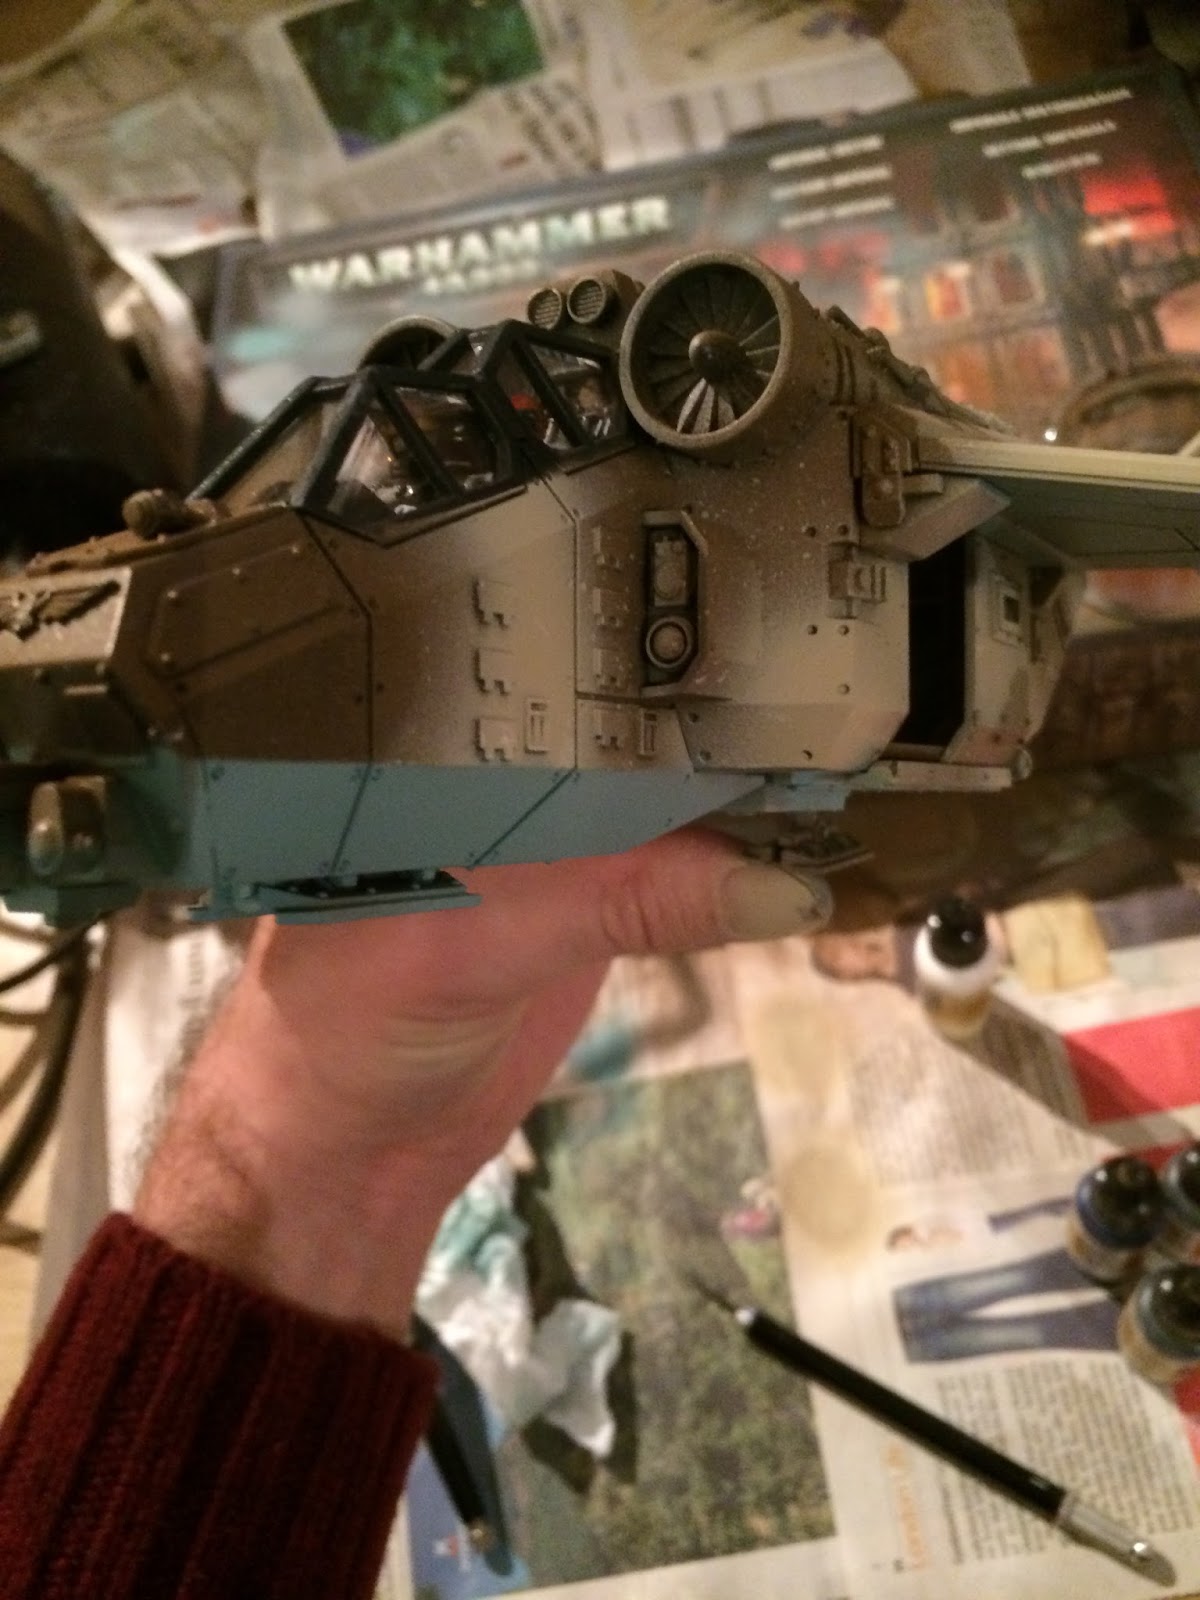
I started off by masking off the cockpits and giving all three a coat of army painter leather brown on all the cammo areas.

You can make out my dodgey invisible tape masking, especially where I began to remove it before taking the shot! I airbrushed on some skyblue.

It actually came out quite well!
And again.

and again.

and once more for luck. You can better see the contrast here, I chose to do sidewalls in cammo with the idea the blue would be very visible if the plane was on the ground, I like how it looks even if its wrong!

I shaded in armour plate joins, rivets, random divits, etc. with sepia and used a little to make trails where grease, grime and rust might have been dragged out during flight.

Weathering proper began on one wing to check out it looked alright. I used a brush to do sharp thin strokes using rhinox hide and then metal along panel and wing edges where damage might be caused. I used sponge weathering to add lighter damage to the main parts of panels, perhaps where paint has distorted a peeled in the sun and finally small lines of highlighted semi circles containing a line of rhinox hide to represent where old chips and scratches had occurred trough the paintwork and then left to tarnish over time.

Another angle of this, overall it builds up to quite a nice effect.

The same effects on the underside of the wing... that possibly no one will ever look at again... sob.


Overhead shot, weathering complete.

Cockpit and nose shot with obligatory angry face painted on (pre weathering so the scratches could get it a little!)

Close up of mr grumpy.


The plane is going to fly a building around with it... its a bit large I know but otherwise the massive bases look rather empty with just normal flock and rubble on. A Praetorian casualty or two might have to find their way onto here but I'll paint them up separately and make sure the flight stand fits around them.
The flight stand will sit on the floor tiles.

The other side of the base.

I've started the hazard stripes around the jet engine intakes, wouldn't want anyone accidentally popping their fingers in before take off. Just these and the base to do to finish the first one... then just another two more!

Thursday, 19 February 2015

Praetorian Commissar with Powerfist

I present one usually painted commissar! I tried to use the colours that are standard across my Praetorians such as yellow trim and cuffs, dark blue trousers with a red stripe, and plenty of red all round to try and make him fit with the army but still have enough black to look like his rank.

Here's one of his back so you can see a bit more powerfist and sword detail.
I chose the model as I love the pose and the details and weapons are a nice nod to the old praetorian commissar model I have knocking around somewhere. Also I dislike the new plastic model as he looks like a pirate... and he has a chain from his weapon to his lapel. HIS LAPEL!
Sorry for the slightly blurry images. My camera just won't behave!


Monday, 16 February 2015

Praetorian 500pts Army list for escalation campaign


My friends and I have been planning an escalation campaign for around a year and a half now. It's due to start in March so I'm planning out my armies to ensure I've got the right troops painted in advance as otherwise it might not happen during the campaign and I'll end up in trouble part way through! We've got a good mix of armies included, with two tau, one iron hands, one sisters of battle, one tempestus scions/inquisition, one dark eldar and one craftworld eldar/harlequins (awaiting full releases to find out quite what this will entail!)

The aim is to start with 500pts and increase by 250pts each month after the first. Here is my first 500pts. The aim is to have good lists rather than abusive power gamer lists so we have limits on forgeworld and 30k units. One flier every 1001 pts and a group veto system setup with list submission windows and time for feedback. As a result I chose my guard so I can have some powerful chimera vet action and use my fluffy ratlings, ogryns and the like for entertainment value. I've painted these models up ages ago and rarely do they make it to the table due to their awfulness!

The list contains a command squad in a chimera, two veteran squads in chimeras and three ratling snipers because they're cool.

He's the command squad. I need to think up a suitable name for the well bearded fellow. Its got a lascannon and two plasma guns to take it to tau crisis suits and the like. I've tried to design my squads to be able to have a go at most unit types and this is no exception.

The three ratling snipers. With scout and being able to claim objectives in 7th these chaps might actually not be completely useless for a change. They will probably still spend most of the game hiding and occasionally trying to pull off a unit pin.

Veteran squad one. I need to sort out a base for the autocannon team I realized. They're equipped with an autocannon to deal with long range transports and infantry as well as a melta gun and flamer if they get up close and personal with any targets.


Veteran squad two. Generally I group weapons so three melta or three flamer, however in such a small game I decided to mix them so that my opponents couldn't so easily target the unit and thus the weapons they are weakest against.

Each squad has a chimera, they will be armed with multi lazers and heavy flamers to be able to have a go at anything going. We had previously had an ork and tyranid player so perhaps now heavy bolters would be better but what can you do!

My models are on display here on my friend Arthur's lovely forgeworld board with the GW building kits scattered across which will represent two to three of the urban environments on 3 of the 9 planets we have in the system to play on. Pictures of the amazing campaign map he has had made and the planets backgrounds to come in the future.

Any thoughts, ideas, or advice on the smooth running of campaigns or on my army list would be very welcome!


Friday, 13 February 2015

'The Jokers' chimera with squad marking for my praetorian vets squad.

One more chimera for my Praetorians. Its pretty standard for my army, the usual army painter leather brown and bone sprayed cammo. Copious weathering in the form of fresh scratches, old corroded chips and drips of sepia from nus bolts and joints for the main body. Rust and dust for metal and tracks. Some squad markings on the left side help break up the fairly monotonous colour scheme that's made worse by the track guards. and a few kill count markings add a touch of character.


Which led me to the right side of the tank, A friend of mine had a drop trooper army commissioned and each sentinal had its own little marking like a classic WW2 plane or similar and they looked awesome. I also wanted something to add just a spot of colour to break up the side of the tank and stop the eye just being drawn to the underslung barrel so I thought I'd give a squad marking a go. I thought a playing card might make a good filler, having a little colour but not being too large. I'd also done the weathering first so wanted something small to fit at an odd angle between my work as I couldn't really be bothered to redo it! I felt a joker with a droopy multi coloured hat could be easier to do and more recognizable without looking to closely. Also it made quite a good sounding squad name 'the jokers'. I'm not convinced its amazing but is a start.

At some point I'd like to go back and add other markings to my older tanks to try and break up the wall of identical looking units. I'm thinking the classic swimsuit lady should probably feature, maybe a snake eyes dice roll, a raptor head and a top hat. I've got seven chimera's, three leman russ and three basilisk painted. My Vendetta has the angry eyes and teeth. I've got another two leman russ, three medusa mortas, three hellhounds, a manticore, two hydra, two more vendetta, three valkyrie and four more chimeras to do so um... could do with some more ideas please! What makes a good tank squad marking?

If I manage to get a few more done and like them enough I might match some banners to some of the designs and do something with the six or so pointless banner bearers I've got sitting around.

Friday, 14 November 2014

Taurox for Praetorian's

My friends and I are planning a non- astartes campaign. The idea was to be escalation. Its been so long in the cooking up that most people actually have a good 1500pts of models done now but there we are. The plan was to provide an excuse for our gaming group to do a new army that wasn't space marines. All of us have at least one marine army and very few have other armies. I decided this was a great excuse to whip out the praetorians. I'll have to do some group army shots at some point as I've done some more infantry but haven't done photos as I've gone about it. Laid out I've got a good 2000pts plus now. My first 500pts will include two vet squads in chimeras and a command swuad in a chimera, but each increase in points will then be 250pts. This is a bit awkward frankly, so I decided to do two Taurox so I could squeeze in two more vet squads in the points. Heres the latest addition:


The model is a bit disjointed in my opinion (see below) so I wanted to use loads of heavy weathering to try and disguise this. I used the same army painter leather and bone in stripes that I've used across my Imperial Guard army and the same weathering techniques but just did more. I could have picked out more details with metal but didn't really like the pointy details much so wanted them to be less visible. A remarkably quick paintjob really, although the kit is a pain to stick together, it took me about as long to paint it as stick it, a completely new experience for me!

These models are a bit funny frankly, the pointy fleur de lis look a bit chaos to me and I think they'd probably look better with a front wheel and rear track. I've seen a few people do this with Kromlech wheels or similar but I felt the new kit was pricey enough for a unit I probably wont use that much. The front section of the thing is a cool old truck, the rear a super modern flat edged box which really looks more space marine than guard with its crisp lines and flat surfaces. The kit gives you the options to stick your weapons on a turret or on the side, this seems strange as they would obviously act quite differently in game but the codex and the box seem to suggest either is okay. It's all a bit odd to be honest, however having painted one I warmed to it and rather like the thing despite all the above. I put my guns on the turret as it makes it much better in game although I prefer the look without it.
Comments, thoughts and ideas welcome as always!

Monday, 2 September 2013

Imperial Guard command chimera's (for my praetorians)

New stuff!

So sadly I can't take credit for the construction of these. I bought these lovely kitbashed chimeras off ebay. If you wanted to make some yourself it appears fairly easy. They have predator turrets with the autocannons removed to be replaced with multilazers, plasticard trackguards with rivets I believe made from cut off styrene tubing given their slightly varying length. The piece the turret rests on has been pulled back and sits on a piece of plasticard that covers the space in the middle of the tank left when the rear troop carrying part of the tank has been cut back.

I am going to use them for my CCS (centre model with the larger yellow block of the squad marking) and two PCS's (which I have yet to paint!) in games in my friends up and coming no astartes campaign (which I admit feels a bit odd as Spacemarines have just got their re-release but whatever :P its to give us time to actually build the armies!)


I sprayed the base colours on these using army painter skeleton bone and leather brown. I hard line highlighted them with ushabti bone and tallarn sands respectively (old paints bleached bone and graveyard earth). I then weathered them up using both rhinox hide (op. scorched brown) feathering with leadbelcher (op. boltgun metal) feathered over the top off the edges to represent fairly fresh deep scratches into the metal on the edges of doors, armour plates and any other areas that looked like they had a big plain bit of one colour and could do with being broken up a bit. I also used my smiles technique with the same colours I had used to hard line and filled them in with rhinox hide to represent older paint chips that have had time to tarnish. (See my Vendetta post for step by step for these techniques.) I finished off details such as metal reas with leadbelcher and an agrax earthshade wash, gems on the edges of the hatches flat bits and the turret cannon targeter bit in from abaddon black into increasingly light shades of blue through to white. I finished off with some red and yellow squad marks to add a bit of colour and then weathered these up (if your doing them, put the colour in before you weather to stop wasting time by repainting bits you've spent more time on!).

I like how they have come out, I hope you like them! Any thoughts?

Sunday, 1 September 2013

Vendetta Update

A friend of mine commented about a year ago that my vendetta looked technically well painted but was missing something to break up the grey. He suggested hazard stripes around the engine vents. Low and behold I gave it a try and think it looks much improved. I might add some engine exhaust burn marks like he recommended after seeing it this time, maybe next year eh?


I actually have some new imperial guard stuff done to upload as well, shocking! My friends and I are going to do a non-astartes campaign to mix up our predominantly Marine based games so there should be more praetorian chaps being painted up soon although probably just infantry vet and standard platoons squads for now along with some chimera transports and forgeworld armagedon pattern medusas I recently picked up that are currently drying (after the old mold release agent scrub and hot water reshaping) in pieces on my kitchen table. I have done quite alot more blood angels and some Deathwing in the last year I haven't updated so I need to snap pics of those and get them uploaded.

Sorry for a year-ish of nothing, between studying, moving out and most of my armies being round a friends for easy access gaming I've rather dropped the ball on the blog and will try and rectify this over time. I will also share some lists at somepoint as it would be great to have some feedback on what other people have tried and had success with in the new edition as the new tau and eldar that I have played vs. are pretty immense and pose some significant challenges to my predominantly mech BA and Imperial Guard armies. I'm loving the new edition so far and have pretty much stopped playing fantasy simply because I'd rather play 40k at the moment! (Also I'm quite good at 40K and suck something awful at fantasy since its big rules rehaul!)

Thanks for those who are still following!

Wednesday, 1 June 2011

IG Vendetta complete.

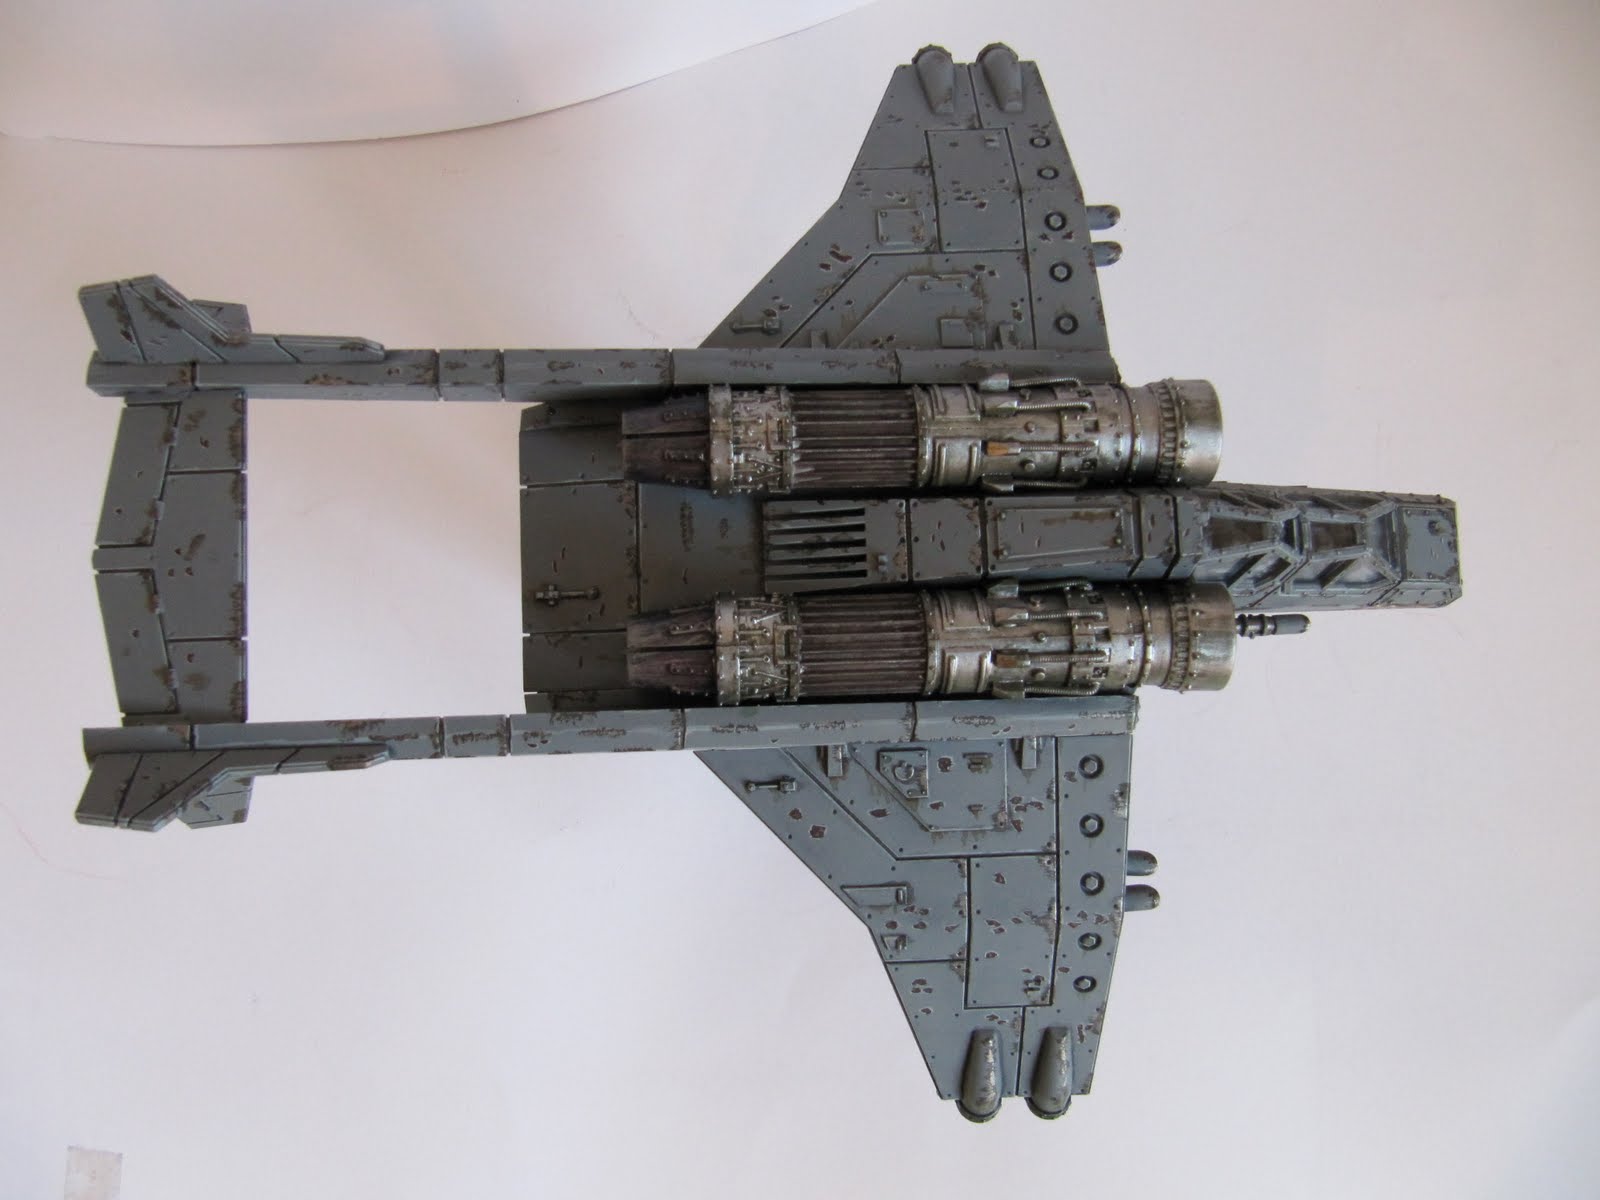
So heres the completed vendetta from my weathering tutorial. The one I went and called a Valkyrie. Whoops. I finished it off by doing a bit more work on the jaws and replicating the weathering all over it. I painted the engines with a shade of green for the exposed metal, shade of devland mud for the greasy bit and washes of red and blue for the heat damaged engine ends. I weathering powdered the engines with verdigris and oil and the landing pads with rust.


I wanted to do something with the HUGE base space so copied a vast number of people in making a small building using the cities of death kit (plus if you want to be a cheese monger you can use it to block LOS, thanks true LOS rules! Sigh). N.B. If your going to flock this then make sure you leave a space for the clear plastic stand (or attach it, but then you have to be really really careful not to paint it!) I wanted the base to be worth looking at but not distract from the model so I kept it in line with the pale dusty browns of my standard basing and a bone coloured building to boot. I then painted all the rocks with charandon granite and then adeptus battlegrey for contrast and washed some darker browns and greys into the base in crevices and at random to break up the ground colour and ad a bit more depth than would be necessary on a 20-25mm scale. I finally used GW dead grass flock, army painter highland tuft 6mm and army painter autumn underground(tiny tiny bits of this) to fill and break up the remaining space.


Tuesday, 24 May 2011

WIP Imperial Guard Armour Army Painter Spray Cammo

Finishing all of these with highlights weathering etc is taking awhile. But I thought the basic cammo looked so good I ought to get a picture up. It reminded me of the old steel legion cammo but a slightly lighter brown. I used Army Painter Leather Brown to basecoat and then Army Painter Skeleton Bone to put lines across them. It took a couple of coats to get the colour right for both processes. Make sure you leave a few mins for it to dry a little before re-applying and practice line thickness on some paper before you double up the cammo lines to avoid overspray! The cans allow a fair bit of control depending on how hard you press.


This really is the easiest and quickest way I could find to paint up cammo that ensures every tank is the same two colours (unlike some of my older tanks where I forgot the scheme or differing layers led to slightly different shades, lame I know but when trying to paint 4 armies at once you suddenly find its 12months since your last tank got painted). Oh and one can of leather brown comfortably covered all of these tanks with multiple coats and some over, it goes without saying the skeleton bone still had over half left.

Wednesday, 20 April 2011

Valkryie WIP How To: Simple Weathering

I wanted to do something different from my desert camo for this, I decided on a light grey for the navy and picked up an army painter spray: Uniform Grey. Its final colour is nice and it sprays on uniformly, smoothly and thinly so no detail is lost. I set to line highlighting and it was frankly very boring looking. Not wanting to do striped camo's etc. I went for something that would keep the overall look while giving you something to look at close up. HEAVY weathering.

Here I'll talk about three methods I used to weather this up:

1st: (Gryphonne Sepia)Wash rust/oil stains:

This is about the easiest way you can add a bit more detail to your units so long as they have a light colour. If theyre darker dry devlan mud or a thinned down snakebite leather/mechrite red mix.


The idea here is to take just a little of the wash colour on your brush and then create dripping stains from areas that might rust or be heavily oiled: bolts, bolted panels, underhanging ledges, etc. Just take a little time to think about where this should be used and I'd generally suggest its a less is more technique. If you wanted to get serious you could use one colour for rust and another for oil in different areas. You can't get easier than this!

2nd Aged Chips:

The idea here is to give the look of small chips where the metal has aged and discoloured. This is underhighlighted to give the impression of light bouncing off the paint under the chip. (Sadly I only worked that out after a bit and my wings have upside down highlights. Still hopefully no-one will look close eh :D)


Above is a rear wing. I'm going to take you through the steps I used to build up these three weathering techniques to give a beaten/used/poorly maintained look. Its got a tiny bit of gryphonne sepia under its flaps' joints. I decided not to use much here as I've got lots elsewhere.


First up is the lower highlights: Take your highlight colour (for me astronomican grey) and draw smiley faces all over your armour plates avoiding the edges (they're for the next technique). Don't worry if theyre a little thick when you paint your next colour you'll paint over them a little.


Paint scorched brown lines using the smiley faces as a guide. Try and cover the thicker highlights so you are left with a very thin constant thickeness line highlight.


For the larger chips go in with a 50/50 scorched brown/chaos black mix to add a darker centre to your corroded patch. You can add a little boltgun metal to some of the very large chips to give the impression they're semi aged or perhaps recently re-chipped.

3 Edge chips and scratches:

Here you want to scratch up your edges, perfect for covering up where your line highlights have got a bit thick! These represent recent damage and continuously worn areas that don't have time to corrode before being re-scratched.


Using a thin or spread out beat up brush feather some of the armour edges with charadon granite. (I moved to the tip because the pic of this step didn't come out right!) I'd recommend not coving all of every edge I went for some of all the forward edges of my plane. If you were doing something orky you could perhaps go overboard and use this instead of edge highlighting your stuff.


Using the same technique feather boltgun metal inside the charadon granite leaving a rim of this left. If you wanted to further this technique you could try line highlighting outside this similar to the technique above but given I was trying to be quick I didn't bother! You can also do some of this on your panels where they're likely to be weathered from use around door handles, where feet will have walked or just occasional random scratches but I'd reconmmend not going overboard with these.


I'll leave you with my wing sections to give you an idea of what an area targeted with lots of all of these techniques ends up looking like. The aim is to try to build up lots of different weathering and colours to break up an otherwise dull and uniform scheme and add a touch of stylized realisim rather than everything looking factory fresh. I hope these help/give you some ideas, they're just how I like to do things!